
We can start to see by the fall and winter decorations making their way into home décor shops that people are getting ready for the colder seasons. We all pine for that hot cup of coffee (or tea) in front of a crackling fire, surrounded by snowfall and candles. But sometimes the fireplaces built into our homes, aren’t really that inviting, or built in dark corners, or quite frankly, just plain ugly. Well, we’re here to tell you that you can get a cozy and inviting fireplace built into the space you want on a minimal budget using some Milk Paint and Stain and Finishing Oil!

Below is a list of supplies you’ll need to complete a similar project. For the mantle, you can choose to build your own (there are tons of DIY plans online) or you can find a salvaged piece that fits your chosen space. We found a pre-built mantel at a re-store.

- Mantel of your choice (prebuilt or DIY)
- Fusion TSP Alternative + Wiping Cloths
- Homestead House Milk Paint Coal Black
- Fusion Beeswax Finish + Wax Brush
- SFO – Cappuccino, Driftwood, White and Ebony
- Electric Sander with 130-180 scuff pads/paper
- Painter’s Tape
- Foam Brush
- Staalmeester Brush
- Buffing Cloths
- ½ inch plywood cut to size of your opening
- Long and short Door Shims
- Wood Glue or Nails ( to adhere shims to plywood)
PREP
The best foundation to a durable finish is always a clean surface. The mantel we picked had tons of deep grooves and mouldings so we wanted to make sure we scrubbed all the surface and removed anything that would interfere with our finish. We used a 1:4 ratio of Fusion TSP Alternative to warm water and scrubbed down our piece with wiping cloths.


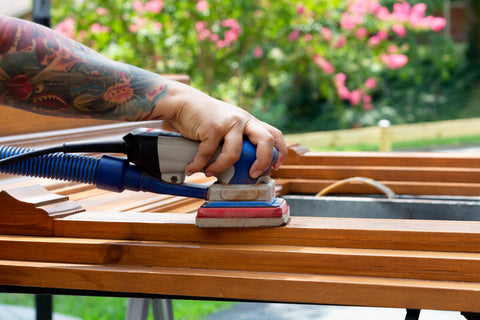
Next, we wanted to lightly scuff sand the surface to give us more adhesion. With milk paint you never know how much will chip off until the paint is applied. We wanted semi-solid coverage with light chipping so a scuff sand helped us to provide some grip for milk paint. We used 120 scuff pads and an electric sander to lightly go over the whole piece. Then use your cleaning solution to wipe away the dust.
While you’re prepping, you can mix up your milk paint ahead of time. We like to let ours sit at least 15 minutes to dissolve the pigments, so making your milk paint ahead of time will help to get your milk paint ready. We mixed a 1:1 ratio of Homestead House Coal Black Milk Paint to water and mixed using a hand held blender.


PAINTING YOUR FURNITURE
Before you start painting your piece, you’ll want to tape off any areas you don’t plan on painting. Our plan was to keep the top of the mantel stained wood, so we taped off the area to keep paint off the wood surface.

MILK PAINT MAGIC
Now it’s time for the milk paint magic. Applying your first coat of paint can be tricky as you’ll be able to tell if you want it mixed thicker or thinner. The first coat of milk paint will be slightly transparent so we knew we would have to paint multiple coats.
You can see what a difference a second coat makes! We waited about 30 minutes between coats and the last coat only took about 20 minutes to completely dry.

DISTRESSING YOUR FINISH
We then wanted to add some weathered character to the mantel. We used our electric sander and 220 scuff pads to smooth out the paint and distress the raised areas. Some areas lightly chipped, but for the most part the bond between milk paint and surface was strong.

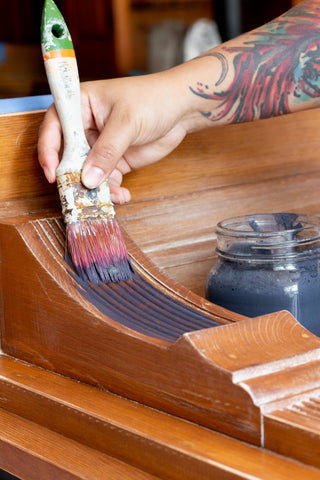
Next, we watered down our remaining milk paint to make a stain and use it to darken the wood top. We just applied with a foam brush and wiped back after a few minutes of letting the paint soak.

After we cleaned up the dust from sanding, we used Fusion Beeswax to seal the milk paint. We love using this wax, especially over dark colours because the built in hemp oil gives us a deep, rich black while providing a satin luster.


Build your backboard
If you have a nice textured background or prefer to keep the mantle opening as is, you can choose to skip this step. We wanted to level up the rustic elegance of the milk paint by making our own rustic wood backer in a herringbone pattern.
We used a combination of long and short door shims over ½ inch thick plywood to make our backer.

We started by sorting our shims into 4 piles; one for each colour of Stain and Finishing Oil we were using.
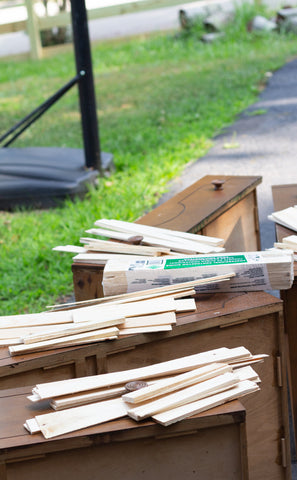
Then we stained each of the shim piles in Cappuccino, Driftwood, Ebony and White. After the stain had dried at least 6 hours, we started to play with the pattern, first by deciding which colours we wanted next to each other. We didn’t want there to be a specific pattern, so our starting point was just layering the colours that complimented each other well.

Before we attached the final pattern, we drew a centre line down the ½ inch plywood to keep our pattern straight. Then we used a combination of wood glue and nails to secure each piece of our shims in our final pattern.


Then attach your backer to your mantle using nails or staples.
Get Cosy!
The transformation on this space and mantle is stunning! We knew that a faux fireplace with a custom mantel would make a huge statement on a blank wall. And it also gives us that cozy vignette we’ve been waiting for!

We wanted to create the warm appearance of a fireplace so we added a candelabra with some pillar candles to give us our fire effect. We love how it just warms up the space and adds a luminary element.

Another part of this piece we love so much is how perfect the distressing is. It brings through the warm element of the wood underneath while giving us the appearance of time worn age and character.


We are so glad we created this rustic shim backboard. It really brings out the depth of the milk paint and brings in the natural wood texture by highlighting with SFO.


Our finishing touch was the milk paint stained wood top. It cooled the warm tones of the original wood and tied in with the old world look we were going for.

Are you ready to spruce up your spaces with a faux mantel of your own? This project was super easy to tackle and now we have a beautiful space that we can enjoy in chilly months!
